ADVANCED COMPONENT TUTORIALS
LAUNCHER


To
succeed
with
the
construction
of
a
water
rocket,
you
will
have
to
work
very
precisely
and
carefully.
Especially
some
of
the
adhesives
are
pretty
dangerous.
Thus,
please
wear
gloves
when
working
with
adhesive
or
epoxy
and
don‘t
breathe
in
the
gases.
It
is
recommended
to
work
outside
whenever
toxic
gases
could
develop.
The
launch
of
a
water
rocket
may
needs
permission
from
the
competent
authority,
depending
on
your
location.
You
need
the
permission
of
the
landowner
if
you
launch
on
foreign
territory.
Please
wear
safety
goggles
when
pressure
testing
or
launching
your
rocket.
Keep
a
safe
distance
to
the
pressurized
rocket.
We
can
not
guarantee
the
accuracy,
completeness
or
feasibility
of
any
our
tutorials.
We
are
not
responsible
for
any
damage
or
harm
on
objects,
animals
or
humans.
We
do
not
guarantee
that
the
information
provided
on
this
web
site
is
complete,
accurate
and
always
current.
This
applies
also
to all links cited on this website points, either directly or indirectly. We are not responsible for any damage or harm to objects or individuals.
SAFETY GUIDELINES AND DISCLAIMER
REFERENCES
•
Paul Grosse Website - The Copper Tube Launcher
http://grosse.is-a-geek.com/paul/h2orocketlaunchercutube.htm
•
Water Rocket Uh Lab Website - Launcher Construction in Germany:
http://waterrocket.uh-lab.de/launcher.htm
•
Diskussion zum Copper Tube Launcher at German Raketenmodellbau-Forum
http://www.raketenmodellbau.org/forum?action=viewthread&threadid=3655&page=1
•
USWaterRockets.com Website - How to build a cable tie style water rocket launcher
http://www.uswaterrockets.com/construction_&_tutorials/cable_tie_launcher/tutorial.htm
•
AirCommandRockets.com Website - Clark Cable Tie Launcher
http://www.aircommandrockets.com/construction_9.htm
•
Warafreak at German Raketenmodellbau-Forum - Meine neue Startrampe
http://www.raketenmodellbau.org/forum?action=viewthread&threadid=801451&page=1
•
M1Molter, der Heimwerker on YouTube - Kupferrohr verlöten! - aber wie? (German)
https://youtu.be/0v9TqISa4DQ
•
TheCrazyHobbyists Website - Filling System (German)
https://thecrazyhobbyists.jimdo.com/wasserraketen/betankungssystem/
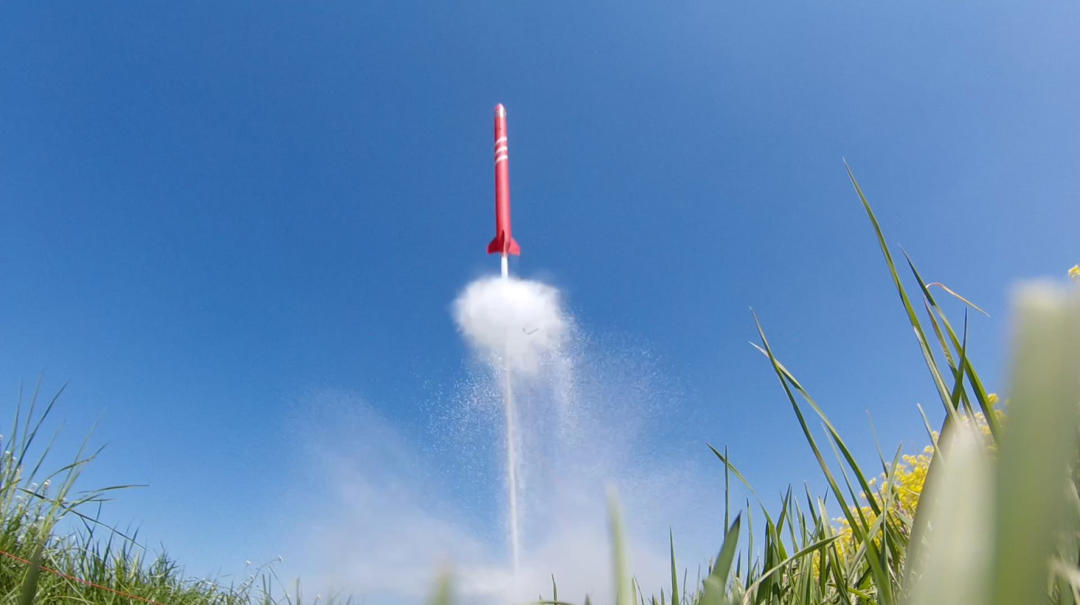
WHAT‘S NEXT?
Take a look at our other tutorials…


bottle
The
best
plan,
the
strongest
pressure
vessel
and
the
most
reliable
parachute
system
is
completely
useless
if
the
launch
fails
before
it
really
starts.
To
prevent
this,
we
want
to
show
you
in
this
tutorial
the
construction
of
a
launcher,
which
is
not
only
extremely
stable,
but
is
also
able
to
fill
and
accelerate
the
rocket
sufficiently.
While
smaller
water
rockets
often
use
a
launch
system
based
on
garden
hose
components,
we
want
to
show
you
the
construction
of
a
Full
Bore
Launcher
(FBL)
in
this
video.
The
advantage
of
a
FBL
is
that
the
entire
bottle
opening
of
the
pressure
vessel
can
be
used
to
push
the
water
out of the rocket as quickly as possible, while other systems often require smaller openings.
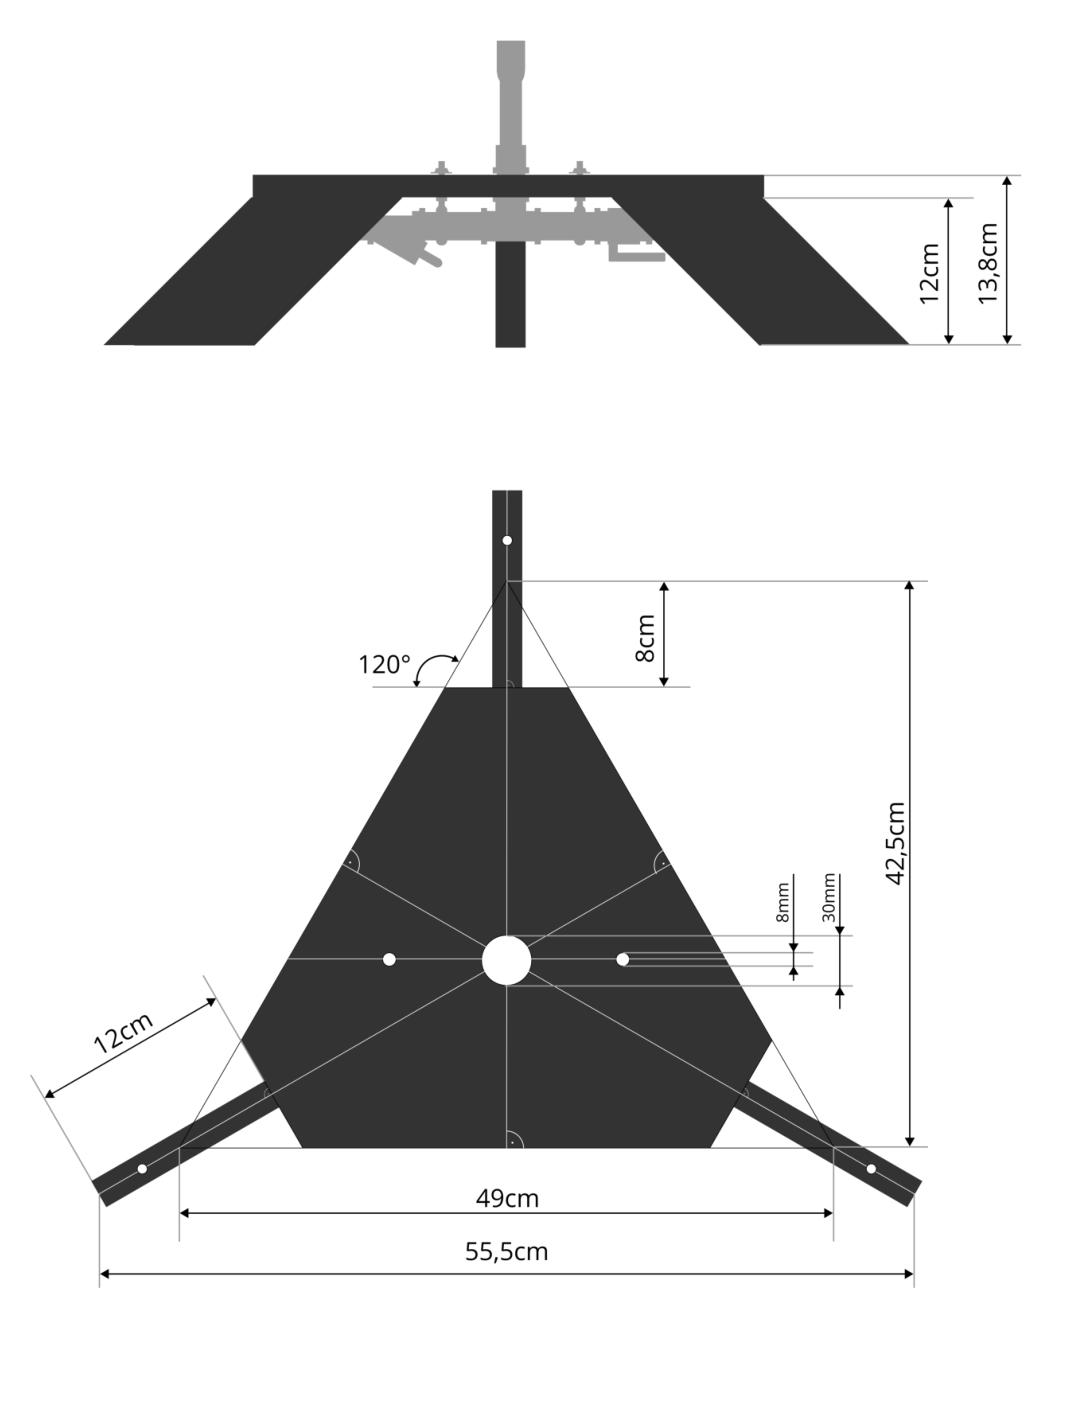
MAIN CONSTRUCTION
First
of
all,
let's
talk
about
the
main
construction.
In
our
case,
this
consists
of
18mm
thick
plywood
.
This
thickness
is
necessary
to
withstand
the
heavy
forces
during
operation.
The
components
of
the
launcher
are
a
base
plate
and
three
feet
of
the
same
size.
The
feet
should
have
a
hole
on
the
underside,
which
will
later
allow
it
to
secure
the
launcher
to
the
ground.
The
base
plate
has
some
holes
as
well,
so
that
the
pipe
system
can
be
attached
later.
You
can
download
a
detailed
technical
drawing
with
all
relevant
dimensions
of
the
main
construction
as
a
PDF
file.
Next,
you
should
prime
the
construction
and
then
apply
external
coating
.
After
waiting
a
day,
the
feet
can
be
screwed
to
the base plate.
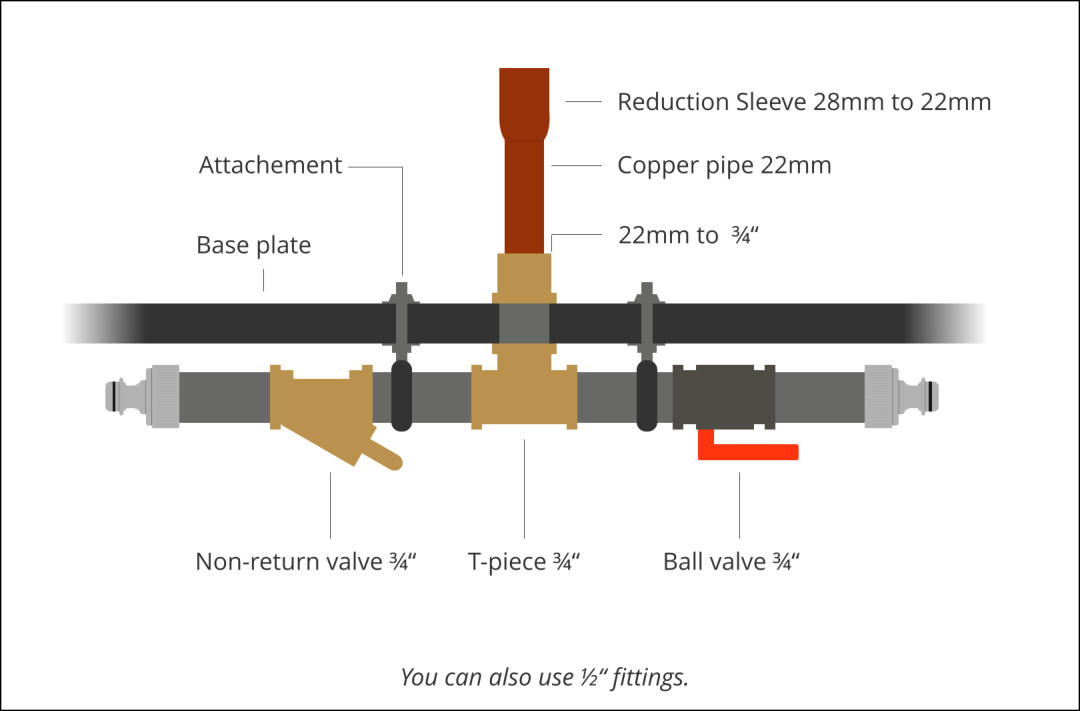
PIPE SYSTEM
Now,
we
can
take
care
of
the
core
of
the
launch
pad
-
the
pipe
system,
which
will
later
supply
the
rocket
with
compressed
air
and
water.
This
consists
of
a
set
of
fittings
that
are
screwed
together.
Use
some
Teflon
tape
to
seal
the
threads
well.
At
both
ends
of
the
water
and
air
supply
there
are
fittings
for
garden
hose
couplings
,
so
that
hoses
can
be
connected
without
any
problems.
Alternatively,
you
can
also
use
pneumatic
connectors
.
On
the
side
of
the
air
connection
there
is
a
non-return
valve
which
prevents
water
from
entering
the
air
pump.
On
the
other
side
there
is
a
ball
valve
to
manually
disconnect
the
water
filling
system.
In
the
middle
of
the
system
there
is
a
T-
piece
into
which
a
short
pipe
with
a
suitable
thread
has
been
screwed
in.
The
system
is
now
attached
from
below
to
the
base
plate
of
the
launcher.
We
recommend using two
pipe clamps
and threaded rods.
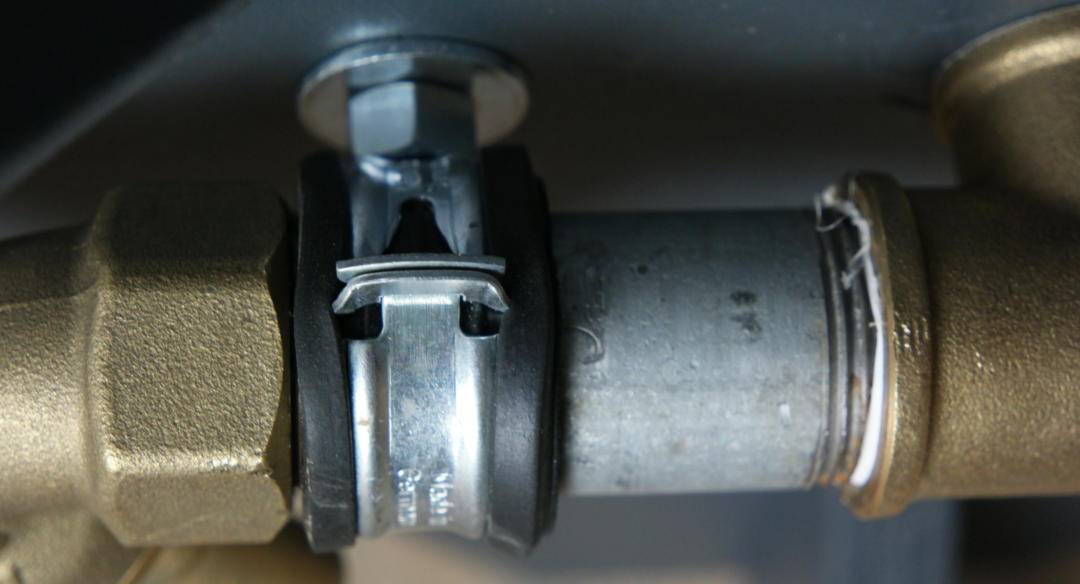
Next,
we'll
make
the
connection
between
the
rocket
and
launch
pad.
It
consists
of
a
copper
tube
with
a
diameter
of
22mm.
An
adapter
is
attached
to
one
end
of
the
tube
system.
On
the
other
side,
a
reduction
sleeve
from
28mm
to
22mm
is
fitted.
They
are
attached
by
soldering
them
together.
First
of
all,
the
parts
are
sanded
with
a
special
cleaning
fleece
at
the
corresponding
points.
Next,
you
should
apply
some
flux
to
the
soldering
area.
Wear
gloves
and
do
not
to
get
in
contact
with
the
flux.
You
can
then
put
the
parts
together
and
heat
them
with
a
blow
torch
or
a
gas
burner.
It
is
best
not
to
heat
the
joint
directly,
but
to
keep
the
flame
at
a
nearby
point
on
the
pipe.
After
the
tube
has
been
sufficiently
heated,
the
solder
can
now
be
hold
to
the
joint
from
above.
If
you
have
applied
the
flux
correctly,
the
solder
runs
around
the
joint
and
seals
it.
As
soon
as
a
small
drop
forms
on
the
bottom,
you
can
continue
with
the
second
junction.
When
the
connector
has
cooled
down,
you
can
wipe
off
the
remains
of
the
flux
and
start
placing
cable
ties
around
it.
Put
a
bottle
of
the
same
type
as
you
used
on
your
rocket
into
the
reduction
sleeve.
The
cable
ties
should
be
placed
directly
against
the
collar.
First
you
can
use
some
tape
to
fix
the
cable
ties.
Then
pull
two
hose
clamps
around
the
cable
ties
as
tightly
as
possible.
Now
the
connection
can
be
screwed
onto
the
launcher. Don't forget to use
Teflon tape
for that too.
cable ties
PVC pipe
reduction sleeve
O-ring seal
LAUNCH TUBE
TRIGGER
AIR AND WATER SUPPLY
To
ensure
a
stable
and
straight
launch
of
your
rocket,
we
recommend
the
use
of
a
launch
tube.
This
is
basically
just
a
tube,
which
is
inserted
into
the
connector
and
has
the
effect
that
the
rocket
reaches
a
higher
altitude.
We
recommend
to
wrap
some
tape
around
the
launch
tube
before
inserting
it
into
the
launcher.
Unfortunately,
conventional
PVC
pipes
are
often
too
weak
to
withstand
the
high
forces
at
launch.
Therefore,
the
PVC
pipe
with
a
diameter
of 20mm
should be reinforced on the inside with a steel pipe.
Now
only
the
trigger
for
the
launch
pad
is
missing.
You
can
use
a
short
PVC
pipe
,
which
you
put
over
the
connector
and
the
rocket.
As
soon
as
you
pull
the
PVC
pipe
down,
the
rocket
will
launch.
To
prevent
an
unintentional
launch,
we
suggest
using
multiple
cable
ties
as
a
spring.
Now
you
need
a
deflection
.
We
use
a
U-piece
made
of
bent
aluminum
for
this
purpose.
Two
nylon
cords
are
attached
to
the
PVC
pipe.
You
can
now
attach
your
release
line
with
a
snap
hook
Before
you
can
place
your
rocket
on
the
launch
pad,
you
will
need
to
install
an
O-ring
seal
above
the
thread
of
your
rocket.
We
use
a
O-ring
with
a
diameter
of
15.5mm
and
a
t
hickness
of
2.6mm
,
but
slightly
different
sizes
should
also be just as good.
The
last
thing
we
have
to
do
before
the
launcher
is
completed
is
to
take
care
of
the
air
and
water
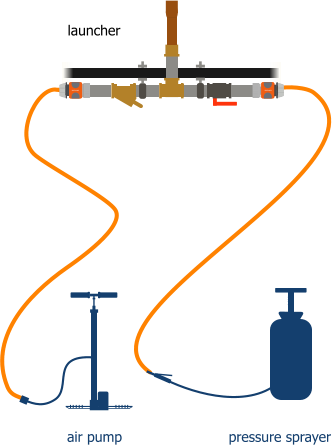
supply.
The
air
is
supplied
using
a
10-meter-long
garden
hose,
which
can
be
connected
to
the
launcher
with
a
coupling.
If
you
have
installed
compressed
air
valves
at
your
launcher,
use
a
compressed
air
hose
instead.
On
the
other
side
of
the
hose
you
have
to
attach
a
car
tire
valve
.
Sand
it,
wrap
it
with
teflon
tape,
put
it
into
the
hose
and
fix
it
with
a
hose
clamp.
You
can
now
connect
your
air
pump
to
this
valve
and
build
up
pressure
in
the
rocket.
The
water
filling
system
is
a
bit
more
complex,
but
it
allows
a
comfortable
filling
of
the
rocket.
We
use
a
pressure
sprayer
of
which
the
nozzle
is
sawn
off.
Instead,
we
have
attached
a
garden
hose
to
it
using
a
hose
clamp.
To
use
your
filling
system,
simply
fill
water
into
the
pressure
sprayer
and
build
up
pressure
using
the
integrated
pump.
Then
open
the
valve
of
your
launch
pad
and
the
water
will
flow
into
the
rocket.
It
is
important
that
you
fill
the
water
into
the
rocket
before you build up pressure with the air pump.
Attachement of the pipe system
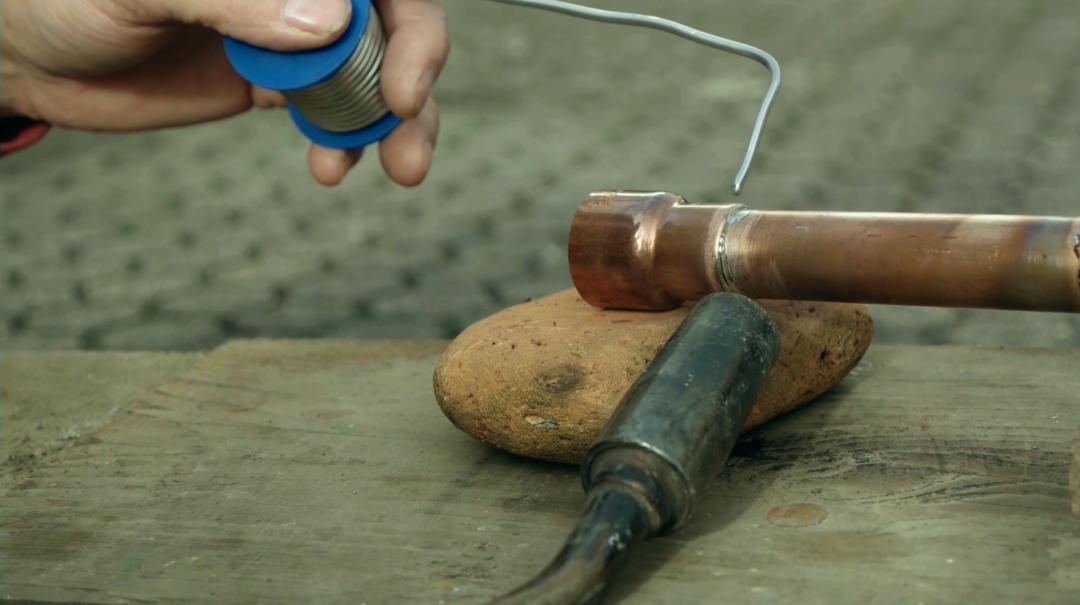
Soldering the components together
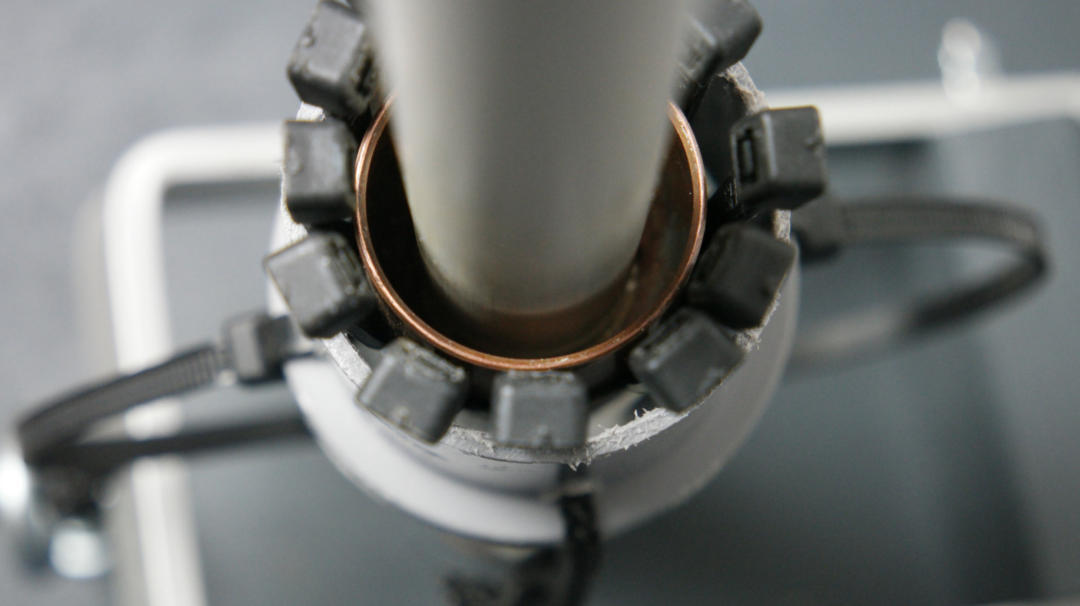
Connection with cable ties attached
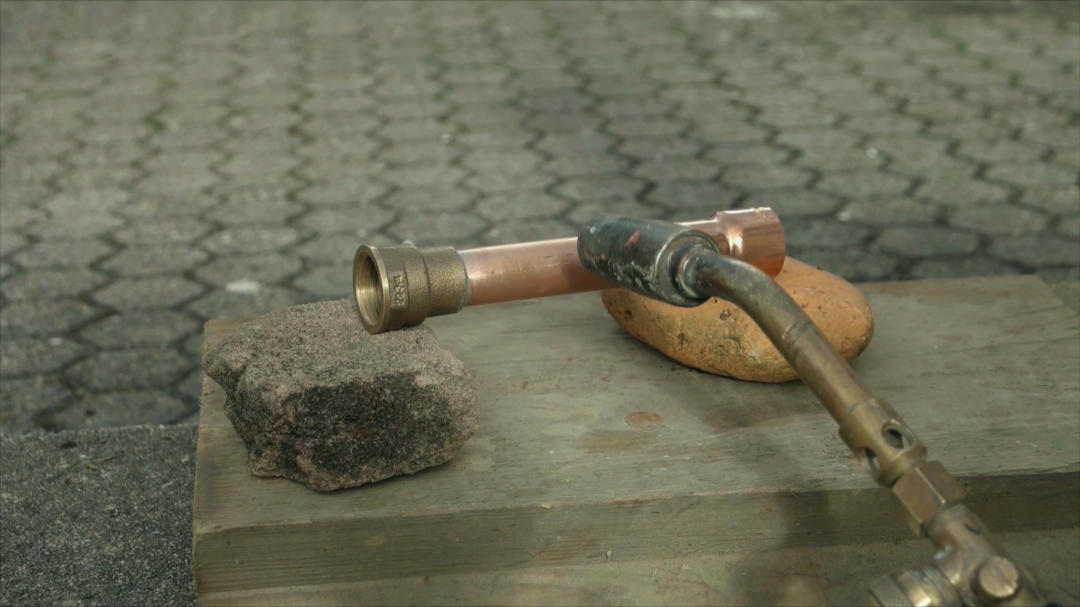
Final connection


English


Change language:


ADVANCED COMPONENT TUTORIALS
LAUNCHER


To
succeed
with
the
construction
of
a
water
rocket,
you
will
have
to
work
very
precisely
and
carefully.
Especially
some
of
the
adhesives
are
pretty
dangerous.
Thus,
please
wear
gloves
when
working
with
adhesive
or
epoxy
and
don‘t
breathe
in
the
gases.
It
is
recommended
to
work
outside
whenever
toxic
gases
could
develop.
The
launch
of
a
water
rocket
may
needs
permission
from
the
competent
authority,
depending
on
your
location.
You
need
the
permission
of
the
landowner
if
you
launch
on
foreign
territory.
Please
wear
safety
goggles
when
pressure
testing
or
launching
your
rocket.
Keep
a
safe
distance
to
the
pressurized
rocket.
We
can
not
guarantee
the
accuracy,
completeness
or
feasibility
of
any
our
tutorials.
We
are
not
responsible
for
any
damage
or
harm
on
objects,
animals
or
humans.
We
do
not
guarantee
that
the
information
provided
on
this
web
site
is
complete,
accurate
and
always
current.
This
applies
also
to
all
links
cited
on
this
website
points,
either
directly
or
indirectly.
We
are
not
responsible
for
any
damage
or
harm
to
objects
or
individuals.
SAFETY GUIDELINES AND DISCLAIMER
REFERENCES
•
Paul Grosse Website - The Copper Tube Launcher
http://grosse.is-a-geek.com/paul/h2orocketlaunchercutube.htm
•
Water Rocket Uh Lab Website - Launcher Construction in
Germany:
http://waterrocket.uh-lab.de/launcher.htm
•
Diskussion zum Copper Tube Launcher at German
Raketenmodellbau-Forum
http://www.raketenmodellbau.org/forum?action=viewthread&t
hreadid=3655&page=1
•
USWaterRockets.com Website - How to build a cable tie
style water rocket launcher
http://www.uswaterrockets.com/construction_&_tutorials/cable_
tie_launcher/tutorial.htm
•
AirCommandRockets.com Website - Clark Cable Tie
Launcher
http://www.aircommandrockets.com/construction_9.htm
•
Warafreak at German Raketenmodellbau-Forum - Meine
neue Startrampe
http://www.raketenmodellbau.org/forum?action=viewthread&t
hreadid=801451&page=1
•
M1Molter, der Heimwerker on YouTube - Kupferrohr
verlöten! - aber wie? (German)
https://youtu.be/0v9TqISa4DQ
•
TheCrazyHobbyists Website - Filling System (German)
https://thecrazyhobbyists.jimdo.com/wasserraketen/betankung
ssystem/
WHAT‘S NEXT?
Take a look at our other tutorials…


bottle
The
best
plan,
the
strongest
pressure
vessel
and
the
most
reliable
parachute
system
is
completely
useless
if
the
launch
fails
before
it
really
starts.
To
prevent
this,
we
want
to
show
you
in
this
tutorial
the
construction
of
a
launcher,
which
is
not
only
extremely
stable,
but
is
also
able
to
fill
and
accelerate
the
rocket
sufficiently.
While
smaller
water
rockets
often
use
a
launch
system
based
on
garden
hose
components,
we
want
to
show
you
the
construction
of
a
Full
Bore
Launcher
(FBL)
in
this
video.
The
advantage
of
a
FBL
is
that
the
entire
bottle
opening
of
the
pressure
vessel
can
be
used
to
push
the
water
out
of
the
rocket
as
quickly
as
possible,
while
other
systems
often
require
smaller
openings.
MAIN CONSTRUCTION
First
of
all,
let's
talk
about
the
main
construction.
In
our
case,
this
consists
of
18mm
thick
plywood
.
This
thickness
is
necessary
to
withstand
the
heavy
forces
during
operation.
The
components
of
the
launcher
are
a
base
plate
and
three
feet
of
the
same
size.
The
feet
should
have
a
hole
on
the
underside,
which
will
later
allow
it
to
secure
the
launcher
to
the
ground.
The
base
plate
has
some
holes
as
well,
so
that
the
pipe
system
can
be
attached
later.
You
can
download
a
detailed
technical
drawing
with
all
relevant
dimensions
of
the
main
construction
as
a
PDF
file.
Next,
you
should
prime
the
construction
and
then
apply
external
coating
.
After
waiting
a
day,
the
feet
can
be screwed to the base plate.
PIPE SYSTEM
Now,
we
can
take
care
of
the
core
of
the
launch
pad
-
the
pipe
system,
which
will
later
supply
the
rocket
with
compressed
air
and
water.
This
consists
of
a
set
of
fittings
that
are
screwed
together.
Use
some
Teflon
tape
to
seal
the
threads
well.
At
both
ends
of
the
water
and
air
supply
there
are
fittings
for
garden
hose
couplings
,
so
that
hoses
can
be
connected
without
any
problems.
Alternatively,
you
can
also
use
pneumatic
connectors
.
On
the
side
of
the
air
connection
there
is
a
non-return
valve
which
prevents
water
from
entering
the
air
pump.
On
the
other
side
there
is
a
ball
valve
to
manually
disconnect
the
water
filling
system.
In
the
middle
of
the
system
there
is
a
T-piece
into
which
a
short
pipe
with
a
suitable
thread
has
been
screwed
in.
The
system
is
now
attached
from
below
to
the
base
plate
of
the
launcher.
We
recommend
using
two
pipe clamps
and threaded rods.
Next,
we'll
make
the
connection
between
the
rocket
and
launch
pad.
It
consists
of
a
copper
tube
with
a
diameter
of
22mm.
An
adapter
is
attached
to
one
end
of
the
tube
system.
On
the
other
side,
a
reduction
sleeve
from
28mm
to
22mm
is
fitted.
They
are
attached
by
soldering
them
together.
First
of
all,
the
parts
are
sanded
with
a
special
cleaning
fleece
at
the
corresponding
points.
Next,
you
should
apply
some
flux
to
the
soldering
area.
Wear
gloves
and
do
not
to
get
in
contact
with
the
flux.
You
can
then
put
the
parts
together
and
heat
them
with
a
blow
torch
or
a
gas
burner.
It
is
best
not
to
heat
the
joint
directly,
but
to
keep
the
flame
at
a
nearby
point
on
the
pipe.
After
the
tube
has
been
sufficiently
heated,
the
solder
can
now
be
hold
to
the
joint
from
above.
If
you
have
applied
the
flux
correctly,
the
solder
runs
around
the
joint
and
seals
it.
As
soon
as
a
small
drop
forms
on
the
bottom,
you
can
continue
with
the
second
junction.
When
the
connector
has
cooled
down,
you
can
wipe
off
the
remains
of
the
flux
and
start
placing
cable
ties
around
it.
Put
a
bottle
of
the
same
type
as
you
used
on
your
rocket
into
the
reduction
sleeve.
The
cable
ties
should
be
placed
directly
against
the
collar.
First
you
can
use
some
tape
to
fix
the
cable
ties.
Then
pull
two
hose
clamps
around
the
cable
ties
as
tightly
as
possible.
Now
the
connection
can
be
screwed
onto
the
launcher.
Don't
forget
to
use
Teflon
tape
for
that
too.
cable ties
PVC pipe
reduction sleeve
O-ring seal
LAUNCH TUBE
TRIGGER
AIR AND WATER SUPPLY
To
ensure
a
stable
and
straight
launch
of
your
rocket,
we
recommend
the
use
of
a
launch
tube.
This
is
basically
just
a
tube,
which
is
inserted
into
the
connector
and
has
the
effect
that
the
rocket
reaches
a
higher
altitude.
We
recommend
to
wrap
some
tape
around
the
launch
tube
before
inserting
it
into
the
launcher.
Unfortunately,
conventional
PVC
pipes
are
often
too
weak
to
withstand
the
high
forces
at
launch.
Therefore,
the
PVC
pipe
with
a
diameter
of
20mm
should
be
reinforced
on
the
inside with a steel pipe.
Now
only
the
trigger
for
the
launch
pad
is
missing.
You
can
use
a
short
PVC
pipe
,
which
you
put
over
the
connector
and
the
rocket.
As
soon
as
you
pull
the
PVC
pipe
down,
the
rocket
will
launch.
To
prevent
an
unintentional
launch,
we
suggest
using
multiple
cable
ties
as
a
spring.
Now
you
need
a
deflection
.
We
use
a
U-piece
made
of
bent
aluminum
for
this
purpose.
Two
nylon
cords
are
attached
to
the
PVC
pipe.
You
can
now
attach
your
release
line
with
a
snap
hook
Before
you
can
place
your
rocket
on
the
launch
pad,
you
will
need
to
install
an
O-ring
seal
above
the
thread
of
your
rocket.
We
use
a
O-ring
with
a
diameter
of
15.5mm
and
a
t
hickness
of
2.6mm
,
but
slightly
different
sizes should also be just as good.
The
last
thing
we
have
to
do
before
the
launcher
is
completed
is
to
take
care
of
the
air
and
water
supply.
The
air
is
supplied
using
a
10-meter-long
garden
hose,
which
can
be
connected
to
the
launcher
with
a
coupling.
If
you
have
installed
compressed
air
valves
at
your
launcher,
use
a
compressed
air
hose
instead.
On
the
other
side
of
the
hose
you
have
to
attach
a
car
tire
valve
.
Sand
it,
wrap
it
with
teflon
tape,
put
it
into
the
hose
and
fix
it
with
a
hose
clamp.
You
can
now
connect
your
air
pump
to
this
valve
and
build
up
pressure
in
the
rocket.
The
water
filling
system
is
a
bit
more
complex,
but
it
allows
a
comfortable
filling
of
the
rocket.
We
use
a
pressure
sprayer
of
which
the
nozzle
is
sawn
off.
Instead,
we
have
attached
a
garden
hose
to
it
using
a
hose
clamp.
To
use
your
filling
system,
simply
fill
water
into
the
pressure
sprayer
and
build
up
pressure
using
the
integrated
pump.
Then
open
the
valve
of
your
launch
pad
and
the
water
will
flow
into
the
rocket.
It
is
important
that
you
fill
the
water
into
the
rocket
before you build up pressure with the air pump.
Attachement of the pipe system
Soldering the components together
Connection with cable ties attached
Final connection


English


Change language:


HOME
ABOUT US
ROCKETS
LAUNCHES
ARTICLES
TUTORIALS
EDUCATION


HOME
ABOUT US
ROCKETS
LAUNCHES
ARTICLES
TUTORIALS
EDUCATION