
Cutting off the lower section
Jig consisting of a drilling machine and a cutter
Turning bottles on a hot iron
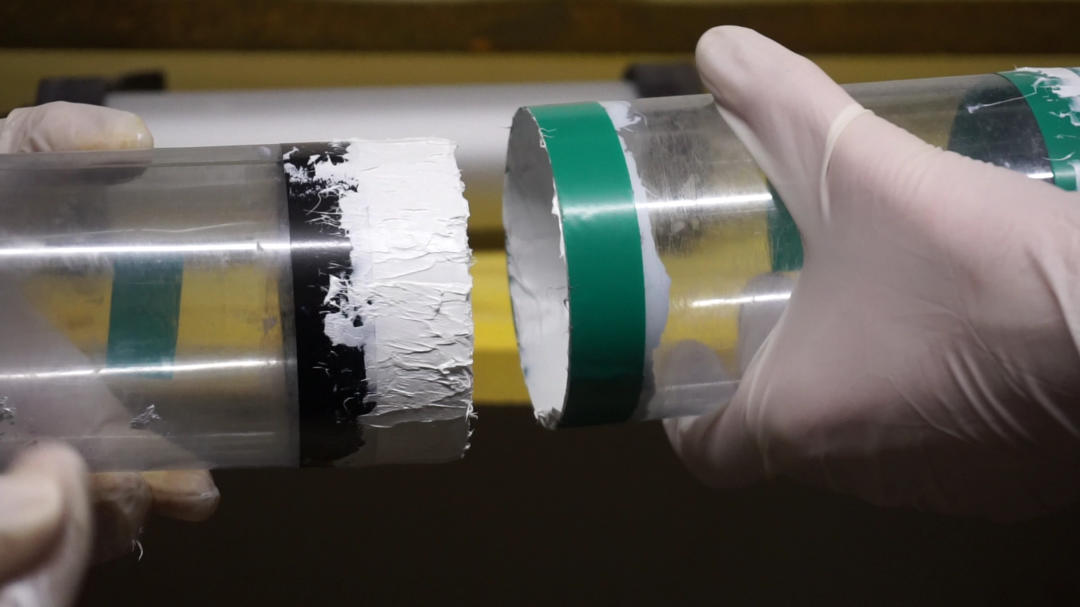
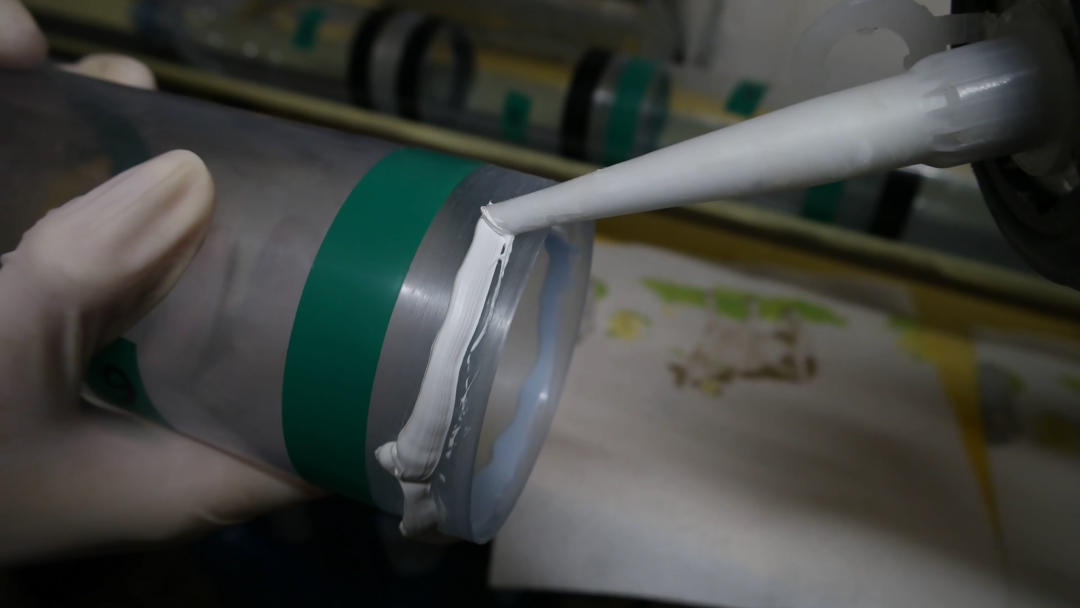
Applying carefully adhesive
Sticking the sections together
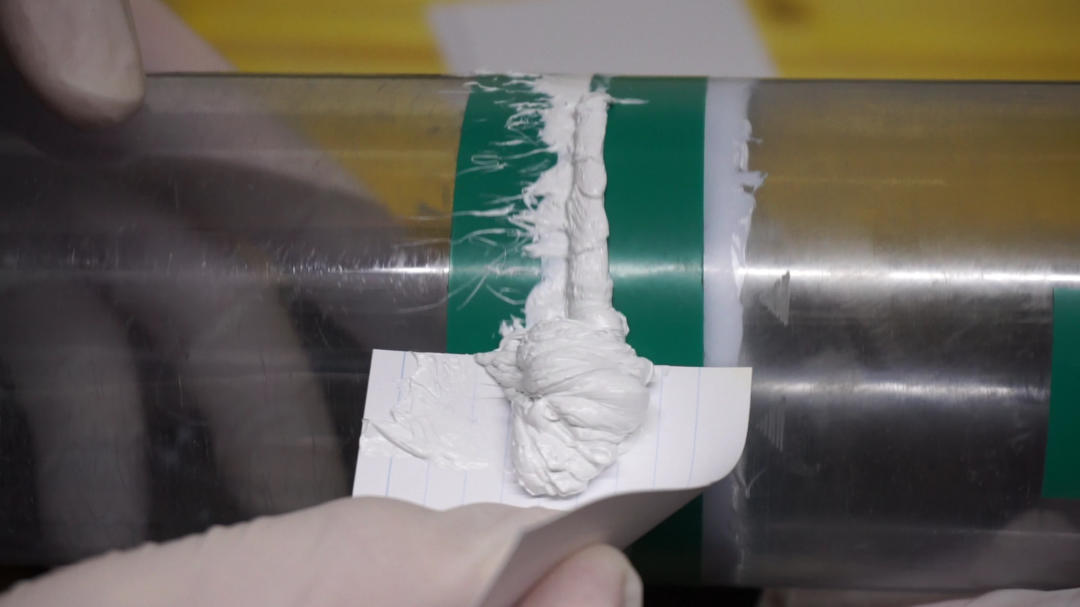
You can reuse some of the excess glue
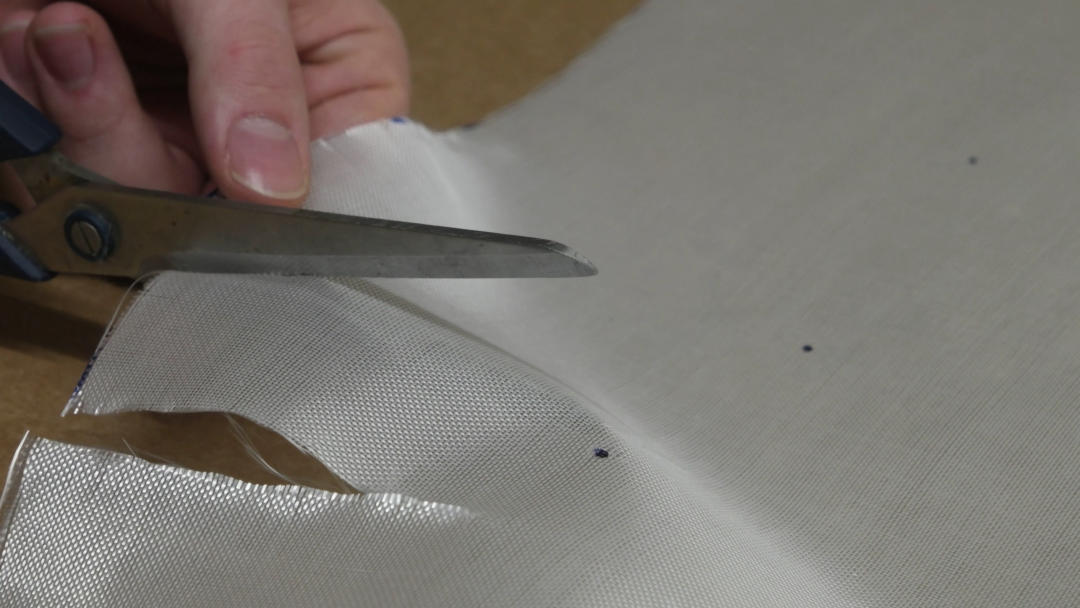

Cutting fiberglass
Fill paterns and notches with single fibers
Press the applied resin through the fiberglass
If
you
are
interested
in
building
advanced
water
rockets
there
is
one
component
of
the
rocket
that
is
critical
to
its
success:
The pressure vessel. In this tutorial we want to show you how to build a very strong and reliable one.
Now
that
your
pressure
vessel
is
nearly
finished,
you
just
have
to
test
it
before
you
can
use
it
for
your
water
rocket.
For
that,
fill
the
chamber
almost
completely
with
water
and
put
it
behind
a
barrier
.
You
can
use
our
launch
pad
to
build
up
pressure,
or
you
can
build
a
dedicated
system
for
it.
A
reinforced
pressure
vessel
can
hold
up
to
18
bars
or
260
psi
,
most
pressure
vessels
without
reinforcement
can
hold
about
half
that.
However,
that
largely
depends
on
how
experienced
you
are
and
how
conscientious
you
work.
You
should
definitely
test
the
chamber
to
a
higher
pressure
than
you
plan
to
use
it
on your rocket. If your chamber has passed the test, it is ready to be used in your rocket.
Before
you
can
get
started
with
the
construction,
you
should
definitely
have
an
idea
of
how
your
water
rocket
will
look
like.
We
recommend
you
to
take
a
look
at
our
tutorial
that
explains
the
different
methods
of
construction
and
what’s
important
when
it
comes
to
building
a
water
rocket.
Regardless
which
method
of
construction
you
go
for,
the
principle
of
building
the
pressure
vessel
is
always the same:
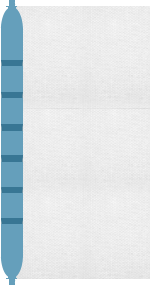
Multiple plastic bottle sections are combined together
.
However,
not
all
plastic
bottles
can
be
used
for
water
rocketry.
The
bottles
should
be
as
strong
as
possible
and
should
have
a
long
cylindrical
section
.
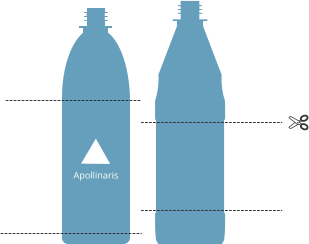
In
this
tutorial,
we
are
using
bottles
from
„Apollinaris“,
but
these
bottles
are
maybe not available to you, depending on your location.
There
are
many
ways
to
combine
the
bottle
sections.
The
most
popular
one
is
to
cut
off
some
parts
and
glue
them
together
with
polyurethane
based
adhesive.
You
can
also
put
together
multiple
pressure
vessels
by
using
specific
connectors
called
Tornado Tubes
.
We
are
going
to
build
a
pressure
vessel
with
six
joints.
However,
the
method
of
construction
and
the
number
of
joints
can
be
adjusted
to
your
liking.
But
first
of
all,
you
have
to
prepare
the
bottles.
Cut
off
both
the
lower
and
the
upper
sections
from
the
bottles,
but
leave
two
bottles
out
and
remove
only
the
lower
section from them but not the neck.

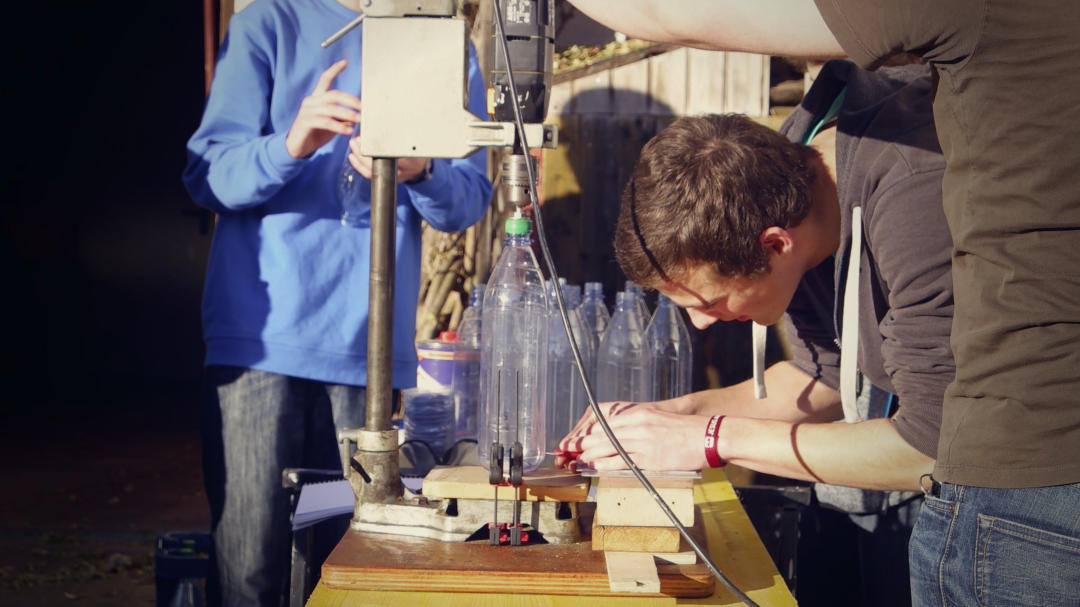
When
cutting
off
the
sections,
it
is
useful
to
mark
the
areas
with
a
pen
and
a
piece
of
paper.
You
can
also
use
a
jig
consisting of a drilling machine and a cutter. It is very important to ensure an
even cutting edge
.
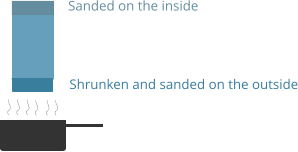
To
combine
the
bottle
sections,
you
have
to
shrink
them
on
one
side
.
The
bottle
type
we
use
in
this
video
is
a
little
bit
conical,
and
so
we
choose
the
slightly
smaller
side.
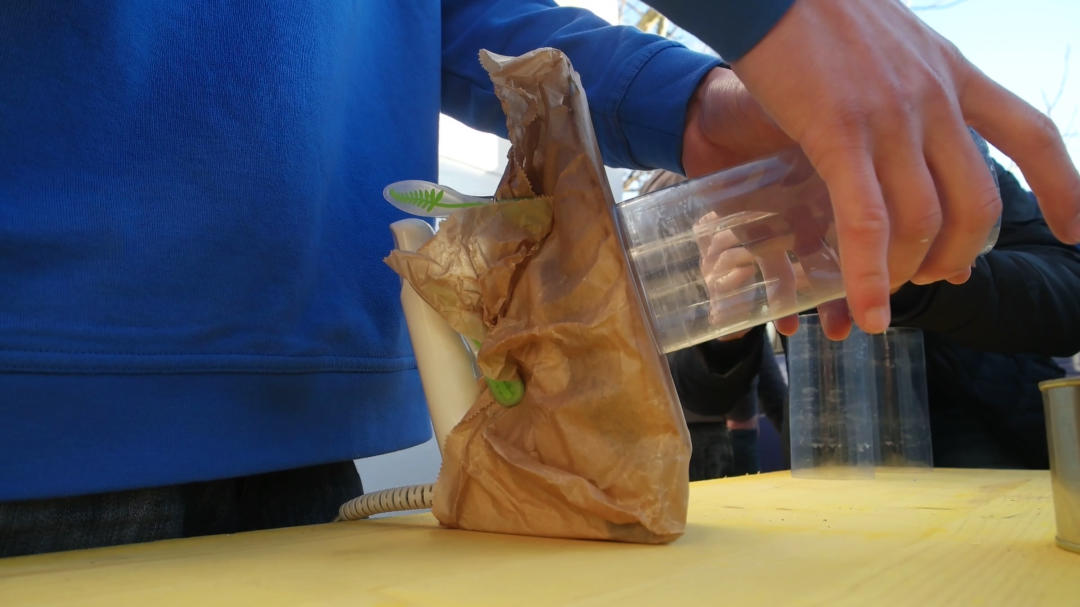
But
before
you
are
ready
to
shrink
the
bottle,
you
have
to
turn
it
on
a
hot
iron
.
To
shrink
it,
just
put
the
bottle
sections
in
about
2.5cm
or
1
inch
deep
hot
water
.
Depending
on
the
water
temperature,
the
process
will
only
take
one
or
two
seconds.
If
you
wait
too
long
the
bottle
will
shrink
too
much.
Always
keep
in
mind
that
it
is
important
that
you
shouldn’t
be
able
to
put
the
sections
together
too
easily.
If
this
is
the
case,
you
should
replace
the
section
before
continuing
with
the
next
step.
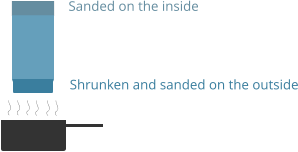
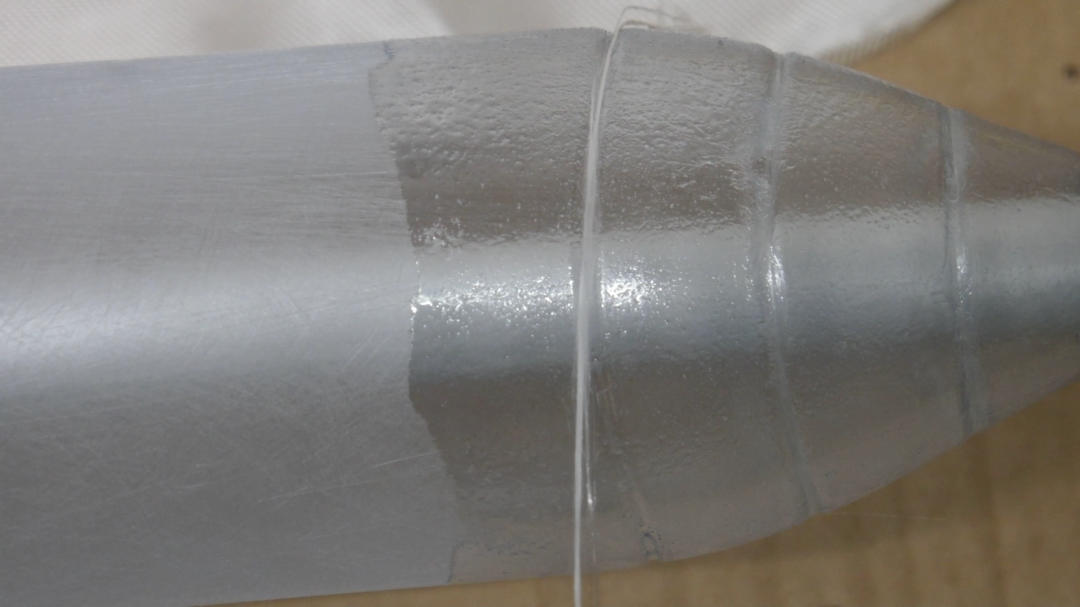
Before
you
glue
the
bottle
sections
together,
you
have
to
sand
the
shrunken
areas
on
the
outside
and
the
other
bottle
ends
on
the
inside.
Furthermore,
you
should
also
clean
the
bottle
sections.
We
recommend
polyurethane
based
adhesive
to
glue
the
bottles
together.
But
watch
out:
Not
every
adhesive
is
suitable
for
building
water
rockets.
For
example,
we
have
good
experience
with
PL
Premium
.
Other
adhesives
like
Sikaflex
11FC
are
very
good
to
seal
something
-
but
not
so
much
for
holding
together
a
rocket
chamber.
Nevertheless,
you
should
choose
this
adhesive
if
you
plan
to
reinforce
your
rocket
with
fiberglass
or
carbon
fiber,
because
the
reinforcement
will
hold
the
vessel
together
while
the
adhesive
seals
the
joints
.
Thus, the pressure at launch can be increased up to 17 bars or 250 psi.
We
recommend
using
a
jig
which
holds
the
chamber
in
place.
It
is
very
important
to
wear
gloves
,
because
you
should
not
come
in
contact
with
the
adhesive.
We
also
suggest
opening
all
the
windows.
Now,
you
can
start
applying
adhesive
on
the
sanded
bottle
areas.
Be
very
careful
when
sticking
the
sections
together
and
do
not
twist
the
sections
while
doing
so
.
You
can
reuse
some
of
the
excess
glue
for
the
next
section.
If
you
have
joined
all
bottle
sections
together,
rotate
the
pressure
vessel
to
make
sure
it
is
not
crooked.
After
that,
wait
at
least
two
or
three
days
before
you
continue
.
In
case
you
don’t
plan
to
reinforce
your
rocket,
you
can
now
proceed
with
the
pressure
test.
We
explain
how
that
works
later
in
this
tutorial.
But
if
you
plan
to
reinforce
your
rocket,
we
still
have
a
lot
of
work
to
do:
The
whole
chamber
has
to
be
sanded.
To
start
with
the
reinforcement
of
your
pressure
vessel,
you
have
to
cut
the
fiber
glass
to
size.
We
recommend
using
two
layers
of
fiber
glass.
That
means
that
the
textile
has
to
be
wrapped
two
times
around
the
chamber.
Thus,
the
dimensions of the required fiber glass are:
Length of the chamber x 6.4 bottle diameters
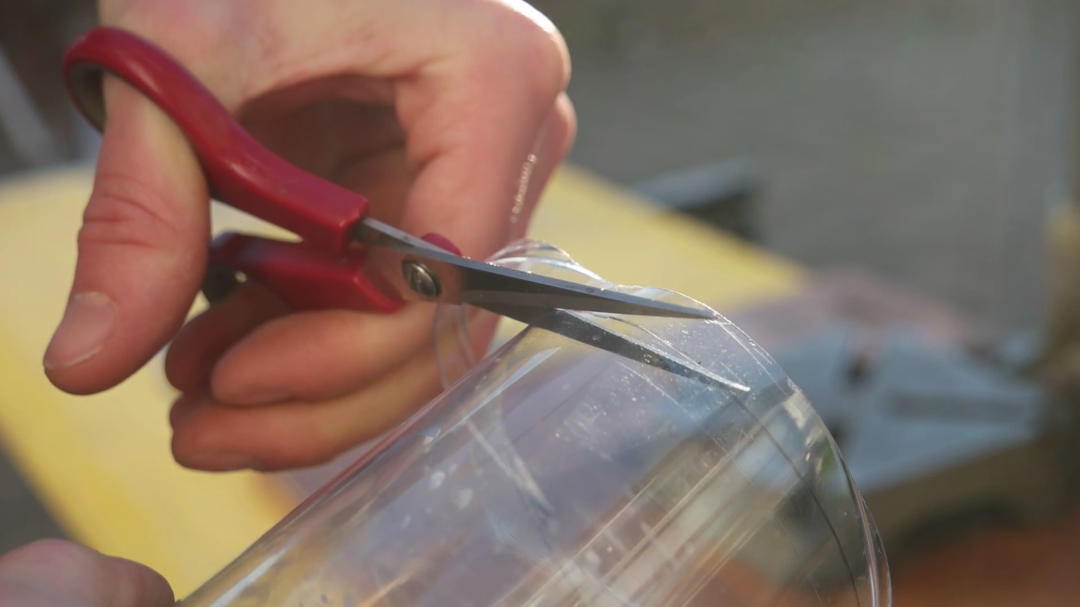
Be
very
careful
when
cutting
the
fiberglass
,
because
you
do
not
want
to
pull
out
fibers
from
the
cloth.
At
both
ends
of
the
fiber
glass,
we
cut
in
little
stripes
so that the reinforcement can fit tightly at the ends of the pressure vessel.
To
reinforce
your
pressure
vessel,
you
once
again
need
a
jig
to
hold
the
vessel
in
place.
We
simply
use
a
PVC
pipe
for
that.
Don’t
forget
to
mask
the
bottle
thread
with
a
little
bit
of
tape.
The
resin
is
mixed
in
the
ratio
given
on
the
packaging.
Keep
in
mind
that
you
should
wear
gloves
and
open
the
windows.
After
that,
the
resin
can
be
applied
to
the
pressure
vessel
using
a
roller.
In
case
the
bottle
type
you
use
has
any
patterns
or
notches
you
can
use
single
fibers
to
fill
them
and make the surface of the chamber more even.
Now
you
can
start
wrapping
the
fiberglass
on
to
the
chamber.
For
that,
lay
the
cloth
very
carefully
on
the
vessel.
Use
the
roller
to
press
the
applied
resin
on
the
chamber
trough
the
fiberglass
until
it’s
see-trough.
Every
now
and
then
you
may
have
to
add
some
resin,
especially
at
the
second
layer.
However,
keep
in
mind
that
you
shouldn’t
use
too
much
resin
because
that
increases
the
weight
of
your
rocket.
Be
very
thorough
at
the
ends
of
the
pressure
vessels.
After
completion,
we
suggest
wrapping
a
single
fiber
around
the
thinnest
part
of
the
bottleneck.
Wait
at
least
a
few
days
before
continuing
with
the
pressure
test,
we
even
recommend
waiting
a
week.
But
that
doesn’t
mean
that
you
can’t
do
anything
in
this
time:
You
can
remove
protruding
fibers
and
you
can
sand,
if
necessary, parts of the vessel using
wet and dry sandpaper
.

PART 1: BUILDING PRESSURE VESSELS
PART 2: REINFORCEMENT OF THE CHAMBER (OPTIONAL)
PART 3: PRESSURE TEST
ADVANCED COMPONENT TUTORIALS
PRESSURE VESSELS & REINFORCEMENT


To
succeed
with
the
construction
of
a
water
rocket,
you
will
have
to
work
very
precisely
and
carefully.
Especially
some
of
the
adhesives
are
pretty
dangerous.
Thus,
please
wear
gloves
when
working
with
adhesive
or
epoxy
and
don‘t
breathe
in
the
gases.
It
is
recommended
to
work
outside
whenever
toxic
gases
could
develop.
The
launch
of
a
water
rocket
may
needs
permission
from
the
competent
authority,
depending
on
your
location.
You
need
the
permission
of
the
landowner
if
you
launch
on
foreign
territory.
Please
wear
safety
goggles
when
pressure
testing
or
launching
your
rocket.
Keep
a
safe
distance
to
the
pressurized
rocket.
We
can
not
guarantee
the
accuracy,
completeness
or
feasibility
of
any
our
tutorials.
We
are
not
responsible
for
any
damage
or
harm
on
objects,
animals
or
humans.
We
do
not
guarantee
that
the
information
provided
on
this
web
site
is
complete,
accurate
and
always
current.
This
applies
also
to all links cited on this website points, either directly or indirectly. We are not responsible for any damage or harm to objects or individuals.
SAFETY GUIDELINES AND DISCLAIMER
REFERENCES
BUILDING PRESSURE VESSELS:
•
AirCommandRockets Website - Asymmetric splice #5
http://aircommandrockets.com/construction_6.htm
•
AirCommandRockets on YouTube - Water Rocket Bottle Splicing Tutorial
https://www.youtube.com/watch?v=y8W3zea92Oo
•
U.S. Water Rockets Website - How to splice multiple bottles together to construct a water rocket
http://www.uswaterrockets.com/construction_&_tutorials/bottle_splice/tutorial.htm
•
U.S. Water Rockets on YouTube - How to smake a huge water rocket by splicing bottles together!
https://www.youtube.com/watch?v=tGxOnuNxDoQ
REINFORCING PRESSURE VESSELS:
•
AirCommandRockets on YouTube - Fiberglassing Boosters for the Polaron G2 rocket
https://www.youtube.com/watch?v=LT09fMmPBI0
•
AirCommandRockets Website - Polaron G2 Build Log
http://www.aircommandrockets.com/polaronG2.htm
•
Raketen Teufel in German Model Rocketry Forum - Neue WARA Teufel 6400
https://www.raketenmodellbau.org/forum?action=viewthread&threadid=619052&page=1
English


Change language:


WHAT‘S NEXT?
Take a look at our other tutorials…


Cutting off the lower section
Jig consisting of a drilling machine and a cutter
Turning bottles on a hot iron
Applying carefully adhesive
Sticking the sections together
You can reuse some of the excess glue
Cutting fiberglass
Fill paterns and notches with single fibers
Press the applied resin through the fiberglass
If
you
are
interested
in
building
advanced
water
rockets
there
is
one
component
of
the
rocket
that
is
critical
to
its
success:
The
pressure
vessel.
In
this
tutorial
we
want
to
show
you
how
to
build
a
very
strong and reliable one.
Now
that
your
pressure
vessel
is
nearly
finished,
you
just
have
to
test
it
before
you
can
use
it
for
your
water
rocket.
For
that,
fill
the
chamber
almost
completely
with
water
and
put
it
behind
a
barrier
.
You
can
use
our
launch
pad
to
build
up
pressure,
or
you
can
build
a
dedicated
system
for
it.
A
reinforced
pressure
vessel
can
hold
up
to
18
bars
or
260
psi
,
most
pressure
vessels
without
reinforcement
can
hold
about
half
that.
However,
that
largely
depends
on
how
experienced
you
are
and
how
conscientious
you
work.
You
should
definitely
test
the
chamber
to
a
higher
pressure
than
you
plan
to
use
it
on
your
rocket.
If
your
chamber
has
passed
the
test,
it
is
ready
to
be
used
in your rocket.
Before
you
can
get
started
with
the
construction,
you
should
definitely
have
an
idea
of
how
your
water
rocket
will
look
like.
We
recommend
you
to
take
a
look
at
our
tutorial
that
explains
the
different
methods
of
construction
and
what’s
important
when
it
comes
to
building
a
water
rocket.
Regardless
which
method
of
construction
you
go
for,
the
principle
of
building
the
pressure
vessel
is
always
the
same:
Multiple
plastic
bottle
sections are combined together
.
However,
not
all
plastic
bottles
can
be
used
for
water
rocketry.
The
bottles
should
be
as
strong
as
possible
and
should
have
a
long
cylindrical
section
.
In
this
tutorial,
we
are
using
bottles
from
„Apollinaris“,
but
these
bottles
are
maybe
not
available to you, depending on your location.
There
are
many
ways
to
combine
the
bottle
sections.
The
most
popular
one
is
to
cut
off
some
parts
and
glue
them
together
with
polyurethane
based
adhesive.
You
can
also
put
together
multiple
pressure
vessels
by
using
specific
connectors
called
Tornado Tubes
.
We
are
going
to
build
a
pressure
vessel
with
six
joints.
However,
the
method
of
construction
and
the
number
of
joints
can
be
adjusted
to
your
liking.
But
first
of
all,
you
have
to
prepare
the
bottles.
Cut
off
both
the
lower
and
the
upper
sections
from
the
bottles,
but
leave
two
bottles
out
and
remove
only
the lower section from them but not the neck.
When
cutting
off
the
sections,
it
is
useful
to
mark
the
areas
with
a
pen
and
a
piece
of
paper.
You
can
also
use
a
jig
consisting
of
a
drilling
machine
and
a
cutter.
It
is
very
important
to
ensure
an
even
cutting edge
.
To
combine
the
bottle
sections,
you
have
to
shrink
them
on
one
side
.
The
bottle
type
we
use
in
this
video
is
a
little
bit
conical,
and
so
we
choose
the
slightly
smaller
side.
But
before
you
are
ready
to
shrink
the
bottle,
you
have
to
turn
it
on
a
hot
iron
.
To
shrink
it,
just
put
the
bottle
sections
in
about
2.5cm
or
1
inch
deep
hot
water
.
Depending
on
the
water
temperature,
the
process
will
only
take
one
or
two
seconds.
If
you
wait
too
long
the
bottle
will
shrink
too
much.
Always
keep
in
mind
that
it
is
important
that
you
shouldn’t
be
able
to
put
the
sections
together
too
easily.
If
this
is
the
case,
you
should
replace
the
section
before
continuing
with
the
next
step.
Before
you
glue
the
bottle
sections
together,
you
have
to
sand
the
shrunken
areas
on
the
outside
and
the
other
bottle
ends
on
the
inside.
Furthermore,
you
should
also
clean
the
bottle sections.
We
recommend
polyurethane
based
adhesive
to
glue
the
bottles
together.
But
watch
out:
Not
every
adhesive
is
suitable
for
building
water
rockets.
For
example,
we
have
good
experience
with
PL
Premium
.
Other
adhesives
like
Sikaflex
11FC
are
very
good
to
seal
something
-
but
not
so
much
for
holding
together
a
rocket
chamber.
Nevertheless,
you
should
choose
this
adhesive
if
you
plan
to
reinforce
your
rocket
with
fiberglass
or
carbon
fiber,
because
the
reinforcement
will
hold
the
vessel
together
while
the
adhesive
seals
the
joints
.
Thus,
the
pressure
at
launch
can
be
increased
up
to 17 bars or 250 psi.
We
recommend
using
a
jig
which
holds
the
chamber
in
place.
It
is
very
important
to
wear
gloves
,
because
you
should
not
come
in
contact
with
the
adhesive.
We
also
suggest
opening
all
the
windows.
Now,
you
can
start
applying
adhesive
on
the
sanded
bottle
areas.
Be
very
careful
when
sticking
the
sections
together
and
do
not
twist
the
sections
while
doing
so
.
You
can
reuse
some
of
the
excess
glue
for
the
next
section.
If
you
have
joined
all
bottle
sections
together,
rotate
the
pressure
vessel
to
make
sure
it
is
not
crooked.
After
that,
wait
at
least
two
or
three
days
before
you
continue
.
In
case
you
don’t
plan
to
reinforce
your
rocket,
you
can
now
proceed
with
the
pressure
test.
We
explain
how
that
works
later
in
this
tutorial.
But
if
you
plan
to
reinforce
your
rocket,
we
still
have
a
lot
of
work
to
do:
The
whole
chamber has to be sanded.
To
start
with
the
reinforcement
of
your
pressure
vessel,
you
have
to
cut
the
fiber
glass
to
size.
We
recommend
using
two
layers
of
fiber
glass.
That
means
that
the
textile
has
to
be
wrapped
two
times
around
the
chamber.
Thus,
the
dimensions
of
the
required fiber glass are:
Length of the chamber x 6.4 bottle diameters
Be
very
careful
when
cutting
the
fiberglass
,
because
you
do
not
want
to
pull
out
fibers
from
the
cloth.
At
both
ends
of
the
fiber
glass,
we
cut
in
little
stripes
so
that
the
reinforcement
can
fit
tightly
at
the ends of the pressure vessel.
To
reinforce
your
pressure
vessel,
you
once
again
need
a
jig
to
hold
the
vessel
in
place.
We
simply
use
a
PVC
pipe
for
that.
Don’t
forget
to
mask
the
bottle
thread
with
a
little
bit
of
tape.
The
resin
is
mixed
in
the
ratio
given
on
the
packaging.
Keep
in
mind
that
you
should
wear
gloves
and
open
the
windows.
After
that,
the
resin
can
be
applied
to
the
pressure
vessel
using
a
roller.
In
case
the
bottle
type
you
use
has
any
patterns
or
notches
you
can
use
single
fibers
to
fill
them
and
make
the
surface
of the chamber more even.
Now
you
can
start
wrapping
the
fiberglass
on
to
the
chamber.
For
that,
lay
the
cloth
very
carefully
on
the
vessel.
Use
the
roller
to
press
the
applied
resin
on
the
chamber
trough
the
fiberglass
until
it’s
see-trough.
Every
now
and
then
you
may
have
to
add
some
resin,
especially
at
the
second
layer.
However,
keep
in
mind
that
you
shouldn’t
use
too
much
resin
because
that
increases
the
weight
of
your
rocket.
Be
very
thorough
at
the
ends
of
the
pressure
vessels.
After
completion,
we
suggest
wrapping
a
single
fiber
around
the
thinnest
part
of
the
bottleneck.
Wait
at
least
a
few
days
before
continuing
with
the
pressure
test,
we
even
recommend
waiting
a
week.
But
that
doesn’t
mean
that
you
can’t
do
anything
in
this
time:
You
can
remove
protruding
fibers
and
you
can
sand,
if
necessary,
parts
of
the
vessel
using
wet
and
dry
sandpaper
.
PART 1: PRESSURE VESSELS
PART 2: REINFORCEMENT
OF THE CHAMBER (OPTIONAL)
PART 3: PRESSURE TEST
ADVANCED COMPONENT TUTORIALS
PRESSURE VESSELS
& REINFORCEMENT


To
succeed
with
the
construction
of
a
water
rocket,
you
will
have
to
work
very
precisely
and
carefully.
Especially
some
of
the
adhesives
are
pretty
dangerous.
Thus,
please
wear
gloves
when
working
with
adhesive
or
epoxy
and
don‘t
breathe
in
the
gases.
It
is
recommended
to
work
outside
whenever
toxic
gases
could
develop.
The
launch
of
a
water
rocket
may
needs
permission
from
the
competent
authority,
depending
on
your
location.
You
need
the
permission
of
the
landowner
if
you
launch
on
foreign
territory.
Please
wear
safety
goggles
when
pressure
testing
or
launching
your
rocket.
Keep
a
safe
distance
to
the
pressurized
rocket.
We
can
not
guarantee
the
accuracy,
completeness
or
feasibility
of
any
our
tutorials.
We
are
not
responsible
for
any
damage
or
harm
on
objects,
animals
or
humans.
We
do
not
guarantee
that
the
information
provided
on
this
web
site
is
complete,
accurate
and
always
current.
This
applies
also
to
all
links
cited
on
this
website
points,
either
directly
or
indirectly.
We
are
not
responsible
for
any
damage or harm to objects or individuals.
SAFETY GUIDELINES AND DISCLAIMER
REFERENCES
BUILDING PRESSURE VESSELS:
•
AirCommandRockets Website - Asymmetric splice #5
http://aircommandrockets.com/construction_6.htm
•
AirCommandRockets on YouTube - Water Rocket Bottle
Splicing Tutorial
https://www.youtube.com/watch?v=y8W3zea92Oo
•
U.S. Water Rockets Website - How to splice multiple bottles
together to construct a water rocket
http://www.uswaterrockets.com/construction_&_tutorials/b
ottle_splice/tutorial.htm
•
U.S. Water Rockets on YouTube - How to smake a huge
water rocket by splicing bottles together!
https://www.youtube.com/watch?v=tGxOnuNxDoQ
REINFORCING PRESSURE VESSELS:
•
AirCommandRockets on YouTube - Fiberglassing Boosters
for the Polaron G2 rocket
https://www.youtube.com/watch?v=LT09fMmPBI0
•
AirCommandRockets Website - Polaron G2 Build Log
http://www.aircommandrockets.com/polaronG2.htm
•
Raketen Teufel in German Model Rocketry Forum - Neue
WARA Teufel 6400
https://www.raketenmodellbau.org/forum?action=viewthrea
d&threadid=619052&page=1

WHAT‘S NEXT?
Take a look at our other tutorials…


English


Change language:


HOME
ABOUT US
ROCKETS
LAUNCHES
ARTICLES
TUTORIALS
EDUCATION


HOME
ABOUT US
ROCKETS
LAUNCHES
ARTICLES
TUTORIALS
EDUCATION