If
you
want
to
build
an
advanced
water
rocket,
and
you
don’t
want
to
start
all
over
again
after
the
first
flight,
we
suggest
building
a
recovery
system
for
your
rocket,
which
brings
the
rocket
safely
back
to
earth.
Let’s
begin
with
the
basics:
A
parachute
deployment
mechanism,
the
most
common
recovery
system
for
a
water
rocket,
ejects
the
parachute
at
the
right
time.
That
sounds
pretty
easy
but
in
fact
it
is
one
of
the
most
sophisticated
tasks
when
building
a
water
rocket.
The
system has to be small, light and reliable.
THE TOMMY TIMER
There
are
numerous
approaches
for
parachute
deployment
mechanisms.
In
this
tutorial,
we
show
you
how
to
build
a
mechanical
system
based
on
a
Tommy
Timer
.
Tommy
Timers
can
be
found
in
wind-up
toys
which
are
available
in
toy
stores
and
on
the
internet.
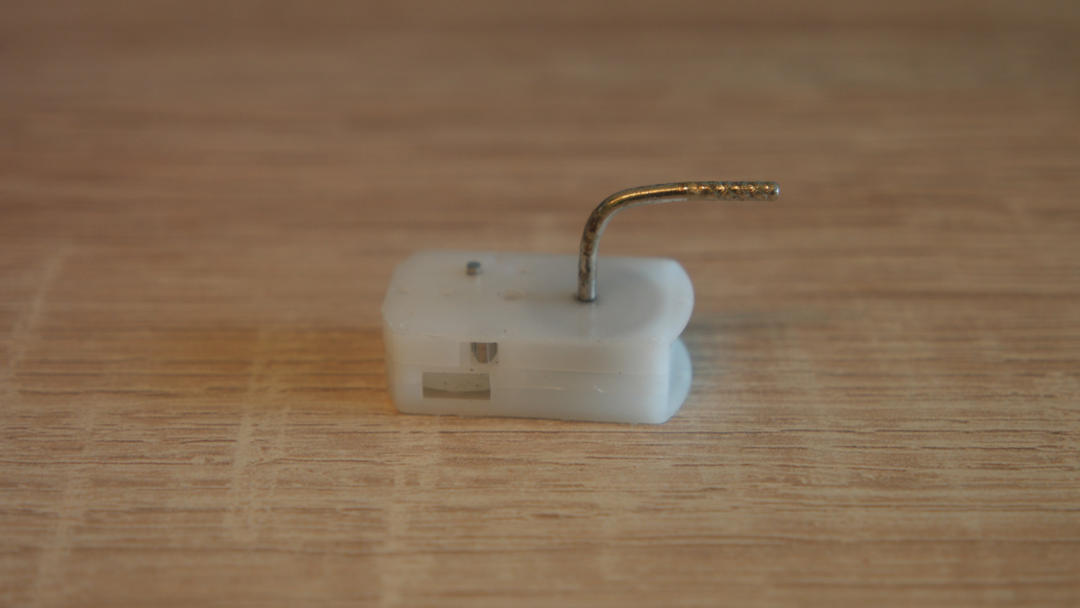
After
removing
the
case
you
can
cut
off
all
protruding
parts
of
the
timer
using
pliers.
You
should
also
remove
the
plastic
handle
from
the
main
axel
by
repeatedly
clamping
it
in
a
vice.
After
that,
bend
the
axel
using
two
sets
of
pliers.
The
modified
timer
will
later
be
the
centerpiece
of
the
system.
You
may
wonder
why
we
use
these
mechanical
timers
and
don’t
work
with
electronic
systems.
Well,
the
answer
is
pretty
simple:
Mechanical
systems
are
way
easier
to
build
and
repair,
are
significantly
lighter
and
a
lot
more
affordable
when
compared
to
electronic
ones
–
this
is
especially
important
when
a
rocket
crashes
and
you
have
to
build
a
new
parachute
deployment
mechanism.
But
luckily,
this
shouldn’t
be
the
case
all
too
often
since
the
two
systems
we
want
to
show
you
in
this
video
have already proven their
reliability
with numerous flights.
WHICH SYSTEM IS SUITABLE?
The
first
system
we
want
to
show
you
is
called
Phoenix
6.
It’s
the
latest
version
of
our
Phoenix
Parachute
Side
Deployment
System
and
is
optimized
for
rockets
with
a
single
large
pressure
vessel.
For
rockets
consisting
of
multiple
pressure
vessel
segments
we
recommend
building
a
Phoenix
Radial
Deployment
System.
This
system
was
originally
developed
by
our
colleagues
from
U.S.
Water
Rockets
,
but
we
adjusted
and
optimized
it
for
the
use
with
a
lightweight mechanical timer.
PHOENIX
6
For
the
construction
of
the
Phoenix
6
Side
Deployment
Mechanism
you
will
need
two
bottles
.
It
is
necessary
to
use
the
same
bottle
type
you
have
already
used
for
your
pressure
vessel.
Cut
off
the
bottom
of
one
of
the
bottles
using
scissors
and
remove
the
thread
of
the
bottle
with
a
saw.
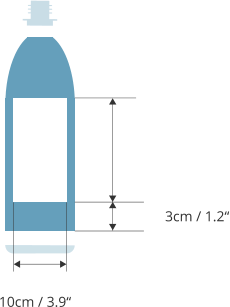
Now
you
have
to
cut
a
big
opening
in
the
cylindrical
section
of
the
bottle.
In
this
case,
the
opening
is
about
10
cm
/
3.9”
wide
and
there
should
be
about
3cm
/
1.2”
left
to
the
lower
edge.
When
you
use
bottles
with
a
bigger
or
smaller
diameter,
you
have
to
adjust
the
width
of
the
opening.
The
bottle
with
the
opening
will
later
be
the
case
of
the
parachute
system
.
But
of
course,
your
case
will
need
a
nosecone.
You
can
either
glue
a
half
table
tennis
ball
on
top
with
epoxy
or
you
can
use
the
nosecone
of
a
fireworks
rocket
for
that.
Now
take
the
second
bottle
and
remove
both
the
bottom
and
the
neck.
The
remaining
cylindrical
section
will
be
separated
in
two
equally
large
pieces.
One
of
these
pieces
will
be
the
parachute door
.
If
you
want
to
paint
your
parachute
system,
you
can
do
this
now.
First,
sand
and
clean
both
the
case
and
the
door.
We
recommend
using
plastic
primer
before
applying
the
paint.
The
spray
paint
can
be
applied
as
soon
as
the
primer
is dry. It‘s maybe necessary to spray several coats.
After
that,
you
can
cut
out
two
round
base
plates
out
of
a
thin
plastic
plate.
You
should
be
able
to
put
the
plates
into
the
system,
but
they
shouldn’t
be
too
small
and
should
remain
in
place
without
any
glue.
After
you
have
placed
the
plates
directly
at
the
lower
and
upper
edge
of
the
opening,
you
can
glue
them
in
place
using
a
hot
glue
gun.
Please
be
careful
and
don’t
use
too
much
adhesive.
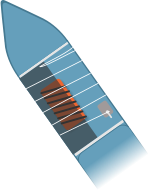
Now
it’s
time
to
mount
the
Tommy
Timer
you
have
modified
at
the
beginning.
All
you
need
are
three
small
holes
in
the
case
located
slightly
above
the
lower
base
plate.
Put
the
bent
axel
of
the
timer
through
the
hole
in
the
middle
and
use
a
small
cable
tie
to
fasten
it.
The
parachute
door,
which
is
placed
over
the
opening,
can
be
fastened
by
using
a
rubber
band.
Just
mount
a
loop
slightly
under
the
upper
base
plate
on
the
case.
Now
you
can
wrap
the
rubber
band
multiple
times
around
the
system
.
Just
hook
the
rubber
band
over
the
bent
timer axel.
To
eject
the
parachute,
you
need
a
spring
.
For
that,
you
can
use
a
part
of
a
thin
walled
plastic
bottle.
You
can
attach
the
bottle
piece
with
wire
on
the
case
but
you
can
also
take
the
whole
cylindrical
section
and
glue
it
in
place
with
a
hot
glue
gun.
However,
if
you
use
this
method
you
have
to
watch
out
that
the
parachute
will
pushed
out
of
the
opening
and
not
to
the
side.
The
parachute
door can now be attached with a rubber band on the parachute.
PHOENIX
RDS
But
before
we
finish
the
construction
of
the
Phoenix
6
mechanism,
we
want
to
take
a
look
at
the
Phoenix
RDS.
The
good
news
is,
that
it
consists
of
even
less
components
than
the
Phoenix
6.
The
most
important
component
is
a
thin
but
flexible
plastic
cover
.
You
can
use
a
document
cover
or
a
thin
walled
bottle
section
for
that.
Mount
the
modified
Tommy
Timer
at
one
edge
of
the
cover
using
two
little
cable
ties.
On
the
opposite
edge
you
can
attach
a
rubber
band
loop.
For
the
next
steps,
you
will
need
a
rocket
with
multiple
pressure
vessel
segments.
Wrap
the
cover
around
the
connection
between
two
segments
,
then
wrap
the
rubber
band
around
it
and
hook
it
on
the
timer
axel.
Another
rubber
band
attached
to
the
cover
and
the
nosecone
of
the
rocket
will
ensure
that
the
cover
will
be
pulled
away
when
the
parachute
gets
ejected.
The
Phoenix
RDS
is
now
already
on
the
same
level
as
the
Phoenix
6
System,
whose
construction
we
described
earlier
in
this
video.
The
following
steps
are
identical
with both systems.
LAST STEPS
To
prevent
the
rubber
band
sliding
over
the
bend
of
the
timer
axel,
glue
a
small
cable
tie
head
with
epoxy
or
superglue
directly
at
the
bend.
Now
you
can
hook
in
the
rubber
band
once
again
and
wind
up
the
timer.
A
few
seconds
later,
the
rubber
band
will
be
released
and
the
parachute
ejected.
Please
be
very
careful
when
testing
the
system
because
you
do
not
want
to
get
the
rubber
band
flick
into
your
eyes.
Now,
the
only
thing
you
need
to
complete
the
construction
is
a
small
trigger
which
holds
the
timer
in
place
until
the
rocket
launches.
Luckily
the
construction
is
fairly
simple.
You
just
need
a
big
cable
tie!
Cut
the
long
part
off
so
that
the
remaining
cable
tie
is
only
5cm
/
2”
long.
Now
wind
up
the
timer
and
place
the
trigger
underneath
the
small
cable
tie
you
used
to
attach
the
timer
so
that
the
timer
can’t
start
running.
Connect
the
trigger
with
wire
and
a
rope
to
your
launch
pad
and
you
are
ready.
But
don’t
forget
to
attach
the
parachute
and
the
system to your rocket first.

Wind-up toy
Modified Tommy Timer
Painted system with nosecone
Base plates
System with spring and parachute
Rubber band wrapped around the system
1) System with trigger (before launch)
2) Timer is running (launch)
3) System opens
4) Parachute is ejected
ADVANCED COMPONENT TUTORIALS
RECOVERY SYSTEMS


To
succeed
with
the
construction
of
a
water
rocket,
you
will
have
to
work
very
precisely
and
carefully.
Especially
some
of
the
adhesives
are
pretty
dangerous.
Thus,
please
wear
gloves
when
working
with
adhesive
or
epoxy
and
don‘t
breathe
in
the
gases.
It
is
recommended
to
work
outside
whenever
toxic
gases
could
develop.
The
launch
of
a
water
rocket
may
needs
permission
from
the
competent
authority,
depending
on
your
location.
You
need
the
permission
of
the
landowner
if
you
launch
on
foreign
territory.
Please
wear
safety
goggles
when
pressure
testing
or
launching
your
rocket.
Keep
a
safe
distance
to
the
pressurized
rocket.
We
can
not
guarantee
the
accuracy,
completeness
or
feasibility
of
any
our
tutorials.
We
are
not
responsible
for
any
damage
or
harm
on
objects,
animals
or
humans.
We
do
not
guarantee
that
the
information
provided
on
this
web
site
is
complete,
accurate
and
always
current.
This
applies
also
to all links cited on this website points, either directly or indirectly. We are not responsible for any damage or harm to objects or individuals.
SAFETY GUIDELINES AND DISCLAIMER
REFERENCES
•
U.S. Water Rockets on YouTube - Ultimate Water Rocket Parachute Deploy Mechanism
https://www.youtube.com/watch?v=UnwP3YXOn-I
•
U.S. Water Rockets Website - How to construct a Radial Parachute Deploy Mechanism
http://www.uswaterrockets.com/construction_&_tutorials/Radial_Deploy/tutorial.htm
•
Aircommando Walldorf on YouTube - Fallschirmsystem el 1.0 | Review
https://www.youtube.com/watch?v=7C4k3HDVM0Y
•
Aircommando Walldorf on YouTube - Wasserraketen Tutorial: Tommy Timer
https://www.youtube.com/watch?v=I7xbnTmoO4o
WHAT‘S NEXT?
Take a look at our other tutorials…


English


Change language:


about our Parachute Recovery Systems
Frequently Asked Questions (FAQ)
•
What‘s the failure rate of your current parachute systems?
Our
Phoenix
5
Side
Deployment
System
is
very
reliable
with
a
failure
rate
of
only
3/70
(in
March
2017)
which
equals
4.2%.
Two
of
the
three
failures
could
have
been
avoided
if
our
current
checklist
had
been
applied
correctly.
Our
version
of
the
Radial
Deployment
System
had
a
few
issues
in
the
beginning,
but
we
were
able
to
improve
the
reliability
a
lot.
Our
latest
addition
to
our
parachute
system
family,
which
is
used
in
the
„Falcon“
rockets, hasn‘t completed enough launches yet for a trustworthy valuation.
•
Why do you (still) use a mechanical tommy timer and no electrical system?
Our
current
tommy
timer
based
systems
like
Phoenix
5
and
Raketfued
RDS
are
more
reliable
than
many
systems
which
are
based
on
electrical
timers
or
sensors.
A
tommy
timer
is
also
a
lot
more
affordable.
That‘s
especially
relevant
because
most
failures
or
crashes
also
affect
the
parachute
system.
Last
but
not
least,
electrical
systems
are
heavier
than
our
mechanical
systems.
Thus,
we
see
no
reason
to
switch
to
an
electrical
system.
•
Which altimeter do you use and where can I buy it?
We
use
a
range
of
altimeters.
In
our
first
water
rocket
which
included
an
altimeter
we
used
the
“Altimax
Simply”
made
by
Rocketronics
,
but
this
altimeter
can‘t
output
the
data
in
a
table
or
chart.
That‘s
why
we
switched
to
a
prototype
made
by
the
German
Aerospace
Center
DLR.
We
also
use
the
Hobbyking
Altimeter
in
many
of
our
rockets.
•
Which parachute size do I need for my rocket?
That depends on its weight. Usually the recommended payload is given on the packaging or on the website.
•
Is there any other method of building a recovery system?
Yes, absolutely! You can 3D print the casing, for example. Learn more here.

You
want
to
build
an
even
more
professional
Parachute
Deployment
Mechanism
and
you
are
interested
in
3D
printing?
With
Phoenix
3D,
we
offer
a
printable
parachute
system
-
and
don‘t
worry,
you don‘t need an own 3D printer for it. Learn more about it
here
.


If
you
want
to
build
an
advanced
water
rocket,
and
you
don’t
want
to
start
all
over
again
after
the
first
flight,
we
suggest
building
a
recovery
system
for
your
rocket,
which
brings
the
rocket
safely
back
to
earth.
Let’s
begin
with
the
basics:
A
parachute
deployment
mechanism,
the
most
common
recovery
system
for
a
water
rocket,
ejects
the
parachute
at
the
right
time.
That
sounds
pretty
easy
but
in
fact
it
is
one
of
the
most
sophisticated
tasks
when
building
a
water
rocket.
The
system
has
to be small, light and reliable.
THE TOMMY TIMER
There
are
numerous
approaches
for
parachute
deployment
mechanisms.
In
this
tutorial,
we
show
you
how
to
build
a
mechanical
system
based
on
a
Tommy
Timer
.
Tommy
Timers
can
be
found
in
wind-up
toys
which
are
available
in
toy
stores
and
on
the
internet.
After
removing
the
case
you
can
cut
off
all
protruding
parts
of
the
timer
using
pliers.
You
should
also
remove
the
plastic
handle
from
the
main
axel
by
repeatedly
clamping
it
in
a
vice.
After
that,
bend
the
axel
using
two
sets
of
pliers.
The
modified
timer
will
later
be
the
centerpiece
of
the
system.
You
may
wonder
why
we
use
these
mechanical
timers
and
don’t
work
with
electronic
systems.
Well,
the
answer
is
pretty
simple:
Mechanical
systems
are
way
easier
to
build
and
repair,
are
significantly
lighter
and
a
lot
more
affordable
when
compared
to
electronic
ones
–
this
is
especially
important
when
a
rocket
crashes
and
you
have
to
build
a
new
parachute
deployment
mechanism.
But
luckily,
this
shouldn’t
be
the
case
all
too
often
since
the
two
systems
we
want
to
show
you
in
this
video
have
already
proven
their
reliability
with numerous flights.
WHICH SYSTEM IS SUITABLE?
The
first
system
we
want
to
show
you
is
called
Phoenix
6.
It’s
the
latest
version
of
our
Phoenix
Parachute
Side
Deployment
System
and
is
optimized
for
rockets
with
a
single
large
pressure
vessel.
For
rockets
consisting
of
multiple
pressure
vessel
segments
we
recommend
building
a
Phoenix
Radial
Deployment
System.
This
system
was
originally
developed
by
our
colleagues
from
U.S.
Water
Rockets
,
but
we
adjusted
and
optimized
it for the use with a lightweight mechanical timer.
PHOENIX
6
For
the
construction
of
the
Phoenix
6
Side
Deployment
Mechanism
you
will
need
two
bottles
.
It
is
necessary
to
use
the
same
bottle
type
you
have
already
used
for
your
pressure
vessel.
Cut
off
the
bottom
of
one
of
the
bottles
using
scissors
and
remove
the
thread
of
the
bottle
with
a
saw.
Now
you
have
to
cut
a
big
opening
in
the
cylindrical
section
of
the
bottle.
In
this
case,
the
opening
is
about
10
cm
/
3.9”
wide
and
there
should
be
about
3cm
/
1.2”
left
to
the
lower
edge.
When
you
use
bottles
with
a
bigger
or
smaller
diameter,
you
have
to
adjust
the
width
of
the
opening.
The
bottle
with
the
opening
will
later
be
the
case
of
the
parachute
system
.
But
of
course,
your
case
will
need
a
nosecone.
You
can
either
glue
a
half
table
tennis
ball
on
top
with
epoxy
or
you
can
use
the
nosecone
of
a
fireworks
rocket
for
that.
Now
take
the
second
bottle
and
remove
both
the
bottom
and
the
neck.
The
remaining
cylindrical
section
will
be
separated
in
two
equally
large
pieces.
One
of
these
pieces
will
be
the
parachute
door
.
If
you
want
to
paint
your
parachute
system,
you
can
do
this
now.
First,
sand
and
clean
both
the
case
and
the
door.
We
recommend
using
plastic
primer
before
applying
the
paint.
The
spray
paint
can
be
applied
as
soon
as
the
primer
is
dry.
It‘s
maybe
necessary to spray several coats.
After
that,
you
can
cut
out
two
round
base
plates
out
of
a
thin
plastic
plate.
You
should
be
able
to
put
the
plates
into
the
system,
but
they
shouldn’t
be
too
small
and
should
remain
in
place
without
any
glue.
After
you
have
placed
the
plates
directly
at
the
lower
and
upper
edge
of
the
opening,
you
can
glue
them
in
place
using
a
hot
glue
gun.
Please
be careful and don’t use too much adhesive.
Now
it’s
time
to
mount
the
Tommy
Timer
you
have
modified
at
the
beginning.
All
you
need
are
three
small
holes
in
the
case
located
slightly
above
the
lower
base
plate.
Put
the
bent
axel
of
the
timer
through
the
hole
in
the
middle
and
use
a
small
cable
tie
to
fasten
it.
The
parachute
door,
which
is
placed
over
the
opening,
can
be
fastened
by
using
a
rubber
band.
Just
mount
a
loop
slightly
under
the
upper
base
plate
on
the
case.
Now
you
can
wrap
the
rubber
band
multiple
times
around
the
system
.
Just
hook
the
rubber
band
over
the
bent
timer axel.
To
eject
the
parachute,
you
need
a
spring
.
For
that,
you
can
use
a
part
of
a
thin
walled
plastic
bottle.
You
can
attach
the
bottle
piece
with
wire
on
the
case
but
you
can
also
take
the
whole
cylindrical
section
and
glue
it
in
place
with
a
hot
glue
gun.
However,
if
you
use
this
method
you
have
to
watch
out
that
the
parachute
will
pushed
out
of
the
opening
and
not
to
the
side.
The
parachute
door
can
now
be
attached
with
a
rubber
band
on
the
parachute.
PHOENIX
RDS
But
before
we
finish
the
construction
of
the
Phoenix
6
mechanism,
we
want
to
take
a
look
at
the
Phoenix
RDS.
The
good
news
is,
that
it
consists
of
even
less
components
than
the
Phoenix
6.
The
most
important
component
is
a
thin
but
flexible
plastic
cover
.
You
can
use
a
document
cover
or
a
thin
walled
bottle
section
for
that.
Mount
the
modified
Tommy
Timer
at
one
edge
of
the
cover
using
two
little
cable
ties.
On
the
opposite
edge
you
can
attach
a
rubber
band
loop.
For
the
next
steps,
you
will
need
a
rocket
with
multiple
pressure
vessel
segments.
Wrap
the
cover
around
the
connection
between
two
segments
,
then
wrap
the
rubber
band
around
it
and
hook
it
on
the
timer
axel.
Another
rubber
band
attached
to
the
cover
and
the
nosecone
of
the
rocket
will
ensure
that
the
cover
will
be
pulled
away
when
the
parachute
gets
ejected.
The
Phoenix
RDS
is
now
already
on
the
same
level
as
the
Phoenix
6
System,
whose
construction
we
described
earlier
in
this
video.
The
following steps are identical with both systems.
LAST STEPS
To
prevent
the
rubber
band
sliding
over
the
bend
of
the
timer
axel,
glue
a
small
cable
tie
head
with
epoxy
or
superglue
directly
at
the
bend.
Now
you
can
hook
in
the
rubber
band
once
again
and
wind
up
the
timer.
A
few
seconds
later,
the
rubber
band
will
be
released
and
the
parachute
ejected.
Please
be
very
careful
when
testing
the
system
because
you
do
not
want
to
get
the
rubber
band
flick
into
your
eyes.
Now,
the
only
thing
you
need
to
complete
the
construction
is
a
small
trigger
which
holds
the
timer
in
place
until
the
rocket
launches.
Luckily
the
construction
is
fairly
simple.
You
just
need
a
big
cable
tie!
Cut
the
long
part
off
so
that
the
remaining
cable
tie
is
only
5cm
/
2”
long.
Now
wind
up
the
timer
and
place
the
trigger
underneath
the
small
cable
tie
you
used
to
attach
the
timer
so
that
the
timer
can’t
start
running.
Connect
the
trigger
with
wire
and
a
rope
to
your
launch
pad
and
you
are
ready.
But
don’t
forget
to
attach
the
parachute
and
the
system
to
your
rocket
first.

Wind-up toy
Modified Tommy Timer
Painted system with nosecone
Base plates
System with spring and parachute
Rubber band wrapped around the system
1) System with trigger (before launch)
2) Timer is running (launch)
3) System opens
4) Parachute is ejected
ADVANCED COMPONENT TUTORIALS
RECOVERY SYSTEMS


To
succeed
with
the
construction
of
a
water
rocket,
you
will
have
to
work
very
precisely
and
carefully.
Especially
some
of
the
adhesives
are
pretty
dangerous.
Thus,
please
wear
gloves
when
working
with
adhesive
or
epoxy
and
don‘t
breathe
in
the
gases.
It
is
recommended
to
work
outside
whenever
toxic
gases
could
develop.
The
launch
of
a
water
rocket
may
needs
permission
from
the
competent
authority,
depending
on
your
location.
You
need
the
permission
of
the
landowner
if
you
launch
on
foreign
territory.
Please
wear
safety
goggles
when
pressure
testing
or
launching
your
rocket.
Keep
a
safe
distance
to
the
pressurized
rocket.
We
can
not
guarantee
the
accuracy,
completeness
or
feasibility
of
any
our
tutorials.
We
are
not
responsible
for
any
damage
or
harm
on
objects,
animals
or
humans.
We
do
not
guarantee
that
the
information
provided
on
this
web
site
is
complete,
accurate
and
always
current.
This
applies
also
to
all
links
cited
on
this
website
points,
either
directly
or
indirectly.
We
are
not
responsible
for
any
damage
or
harm
to
objects
or
individuals.
SAFETY GUIDELINES AND DISCLAIMER
REFERENCES
•
U.S. Water Rockets on YouTube - Ultimate Water Rocket
Parachute Deploy Mechanism
https://www.youtube.com/watch?v=UnwP3YXOn-I
•
U.S. Water Rockets Website - How to construct a Radial
Parachute Deploy Mechanism
http://www.uswaterrockets.com/construction_&_tutorials/R
adial_Deploy/tutorial.htm
•
Aircommando Walldorf on YouTube - Fallschirmsystem el
1.0 | Review
https://www.youtube.com/watch?v=7C4k3HDVM0Y
•
Aircommando Walldorf on YouTube - Wasserraketen
Tutorial: Tommy Timer
https://www.youtube.com/watch?v=I7xbnTmoO4o
WHAT‘S NEXT?
Take a look at our other tutorials…


about our Parachute Recovery Systems
FAQ
•
What‘s the failure rate of your current
parachute systems?
Our
Phoenix
5
Side
Deployment
System
is
very
reliable
with
a
failure
rate
of
only
3/70
(in
March
2017)
which
equals
4.2%.
Two
of
the
three
failures
could
have
been
avoided
if
our
current
checklist
had
been
applied
correctly.
Our
version
of
the
Radial
Deployment
System
had
a
few
issues
in
the
beginning,
but
we
were
able
to
improve
the
reliability
a
lot.
Our
latest
addition
to
our
parachute
system
family,
which
is
used
in
the
„Falcon“
rockets,
hasn‘t
completed
enough
launches
yet
for
a
trustworthy
valuation.
•
Why do you (still) use a mechanical
tommy timer and no electrical system?
Our
current
tommy
timer
based
systems
like
Phoenix
5
and
Raketfued
RDS
are
more
reliable
than
many
systems
which
are
based
on
electrical
timers
or
sensors.
A
tommy
timer
is
also
a
lot
more
affordable.
That‘s
especially
relevant
because
most
failures
or
crashes
also
affect
the
parachute
system.
Last
but
not
least,
electrical
systems
are
heavier
than
our
mechanical
systems.
Thus,
we
see
no
reason
to
switch
to
an
electrical
system.
•
Which altimeter do you use and where
can I buy it?
We
use
a
range
of
altimeters.
In
our
first
water
rocket
which
included
an
altimeter
we
used
the
“Altimax
Simply”
made
by
Rocketronics
,
but
this
altimeter
can‘t
output
the
data
in
a
table
or
chart.
That‘s
why
we
switched
to
a
prototype
made
by
the
German
Aerospace
Center
DLR.
We
also
use
the
Hobbyking
Altimeter
in
many
of
our
rockets.
•
Which parachute size do I need for my
rocket?
That
depends
on
its
weight.
Usually
the
recommended
payload
is
given
on
the
packaging or on the website.
•
Is there any other method of building a
recovery system?
Yes, absolutely! You can 3D print the casing,
for example. Learn more here.

You
want
to
build
an
even
more
professional
Parachute
Deployment
Mechanism
and
you
are
interested
in
3D
printing?
With
Phoenix
3D,
we
offer
a
printable
parachute
system
-
and
don‘t
worry,
you
don‘t
need
an
own
3D
printer
for
it. Learn more about it
here
.


English


Change language:


HOME
ABOUT US
ROCKETS
LAUNCHES
ARTICLES
TUTORIALS
EDUCATION


HOME
ABOUT US
ROCKETS
LAUNCHES
ARTICLES
TUTORIALS
EDUCATION